Buenas a todos!!
Vuelvo a estar aquí con otro making off , espero que os guste y le pueda servir a alguien. En esta ocasión el tema era THE BUTCHER, EL CARNICERO, y mi «chiste» era comparar un médico y un carnicero …en tono broma solamente!!
TUTORIAL TheButcher [ESPAÑOL]

PASO 1
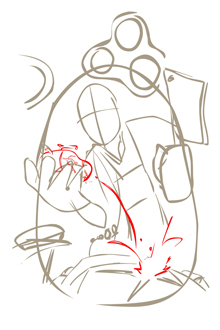
Para este personaje quise representar un cirujano como si fuera un carnicero, la primera idea fue representar un cirujano muy loco y desequilibrado que realiza verdaderas carnicerias en la sala de operaciones. Por eso en mis primeros bocetos se ve al cirujano ataviado con sus ropas y mascarilla, tambien vemos algunos de los aparatos tipicos de un quirofano las luces y la mesa para las herramientas quirurgicas; pero sin olvidarse del hacha que lo reafirma como carnicero.
Más adelante podreis ver que mi idea cambió y representé un carnicero pulcro y refinado, que parece un cirujano (aunque me faltó darle más cara de loco o malvado)….justamente al reves de mi idea inicial. Decidí hacer este cambio porque me estaba centrando demasiado en el cirujano y estaba perdiendo de vista el tema inicial: El carnicero.
PASO2
Como primera toma de contacto, antes de ponerme a realizar la linea definitiva, quise hacer un estudio de la luz. Nunca lo habia hecho directamente en el boceto inicial, pero creo que es muy bueno plantearselo en este momento poco avanzado de la ilustración porque te ayuda a tener claro los focos de atencion, las sombras y el ambiente general que quieres darle al conjunto.
En este punto tuve muy claro que queria centrar la atención del espectador en las manos (que aguantan el corazón y el hacha), en la cara del carnicero y en la herida de la victima. Por eso delimité la zona con un circulo en el boceto para tener claro cual era la zona más iluminada y cual estaria en penumbras.

PASO3
Cuando ya tenia todas las decisiones tomadas pasé a limpio la linea en Flash, creo que en este paso perdí un poco el dinamismo que tenia el boceto inicial, pues se veia mucho más la acción de sacar el corazón de la herida y la pose del carnicero era mas burlona; quizá quise ir demasiado deprisa en esta ilustración. En este paso ya añadí al carnicero con su delantal y en la mesa de operaciones coloqué un cerdo.
Llegados a esta fase del proceso volví a realizar un estudio de luz muy parecido al inicial, pero esta vez centrandome más en los volumenes del personaje. No suelo colorear ilustraciones tan oscuras pero me apetecia probar a realizar una ilustración donde el predominante fuera el negro, asi ademas conseguiria darle un tono más macabro.
PASO4
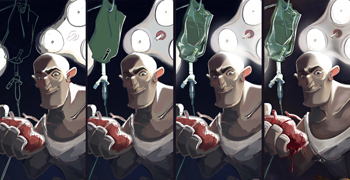
Es el momento de dar color a la ilustración, asi que cogiendo como base el estudio de volúmenes fui coloreando y retocando las diferentes zonas de la ilustración. He elegido colores muy desaturados, entre azules y verdes, tirando a oscuro para que el limite entre luz y sombra sea mucho mas duro y agresivo.
PASO5
En la zona de iluminación directa (el cerdo tendido en la mesa de operaciones) usé un tipo de color muy vivo pues estudié las sombras y luces que dan este tipo de focos de quirofano, después viendo las imagenes de documentacion me di cuenta que el color que dan es muy chillon y saturado…quizá el tipo de tono que le estaba dando era muy desaturado y ha quedado demasiado vivo.
Nuevamente agradecer a los que me votaron y a la organización, porque este concurso ayuda a aprender mucho más y a practicar, que eso siempre nos viene bien.

MAKING OFF TheButcher [ENGLISH]
Hi everybody!!
I come back here with another making of, I hope it helps somebody somehow, enjoy!

STEP 1
For this character I wanted to represent a surgeon as a butcher, my first idea was to represent a very crazy and unbalanced surgeon who carries out real slaughters in the operating room. That’s why in my first sketch we can see a surgeon wearing his clothes and mask, and we also see some of the equipment of a typical operating room, but without forgetting the knife that defines him as a butcher.
Further on you will see that my idea changed and I represented a immaculate and refined butcher, who looks like a surgeon (although I failed to provide him with a crazy or evil face)…. just the opposite of the original idea. I decided to change this because I was focusing on the surgeon too much and was losing sight of the original theme: the butcher.
STEP 2
As a first contact, before getting down to drawing the final line, I wanted to do a study of light. I had never done it right at the initial sketch, but I think it’s very good to consider it at that early stage of the picture because it helps to make clear the focus of attention, the shadows and the general atmosphere that you want to set.
At this point I was certain that I wanted to focus the viewer’s attention on the butcher’s hands (which hold the heart and the knife), on his face and on the victim’s wound. That’s why I outlined the area with a circle in the sketch, to emphasise which area was better lit up and which one would be in shade.

STEP 3
When I just had all the decisions made, I cleaned the line in Flash, I think that in this step I lost the dinamism that the initial sketch had, as the action of taking out the heart from the wound stood out much more clearly and the position of the butcher was more mocking, maybe I went too fast in this illustration. In this step I added an apron on the butcher and put a pig on the operating table.
At this stage I carried out again a study of light very similar to the original, but this time focusing more on the volumes of the character. I don’t usually colour such dark illustrations but I felt like trying to make a draw where the predominant colour was black, so this way I would also give it a more macabre tone.
STEP 4
It’s time to give colour to the picture, so basing on the study of volumes I coloured and retouched the different areas of the picture. I chose desaturated darkish colours, between blue and green so that the boundary between light and shadow became much harder and more aggressive.
STEP 5
In the area of direct light (the pig lying on the operating table) I used a very bright type of colour as I had studied the shadows and lights provided by this type of operating room lamps, and after seeing archive pictures, I realised that the light cast by these lamps brings about very saturated, harsh colours … maybe the kind of tone that I used was very desaturated and it turned out to be bright.
Again, I would like to thank those who voted for me and the organisation, because this contest helps us to learn more and practise, which is always good.