Buenas a todos!!
Hace tiempo que sigo estos concursos mensuales y nunca me decidí a presentarme a ninguno, y eso que ha habido temas muy interesantes. Finalmente con este tema del espantapájaros me animé y aquí estoy en este primer making off para mi, espero que a alguien le pueda ayudar de algun modo.
TUTORIAL ScareCrow [ESPAÑOL]
PASO 1
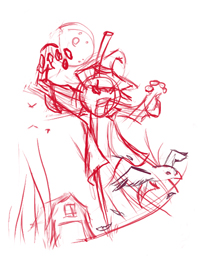
Al pensar en este tema la primera idea que tuve es que tuviera mucho dinamismo, porque en si mismos los espantapájaros son muy estaticos.  Queria representar un espantapájaros que diera mucho miedo, pero sin que esa fuera la intencion inicial (cambiar por….pero no porque su imagen diera miedo sino por las circunstancias en ese momento).
Esa es la razon por la que usé una perspectiva baja, vista desde el punto de vista de los cuervos, de este modo impone mas la figura del espantapajaros. Después inventé toda una historia, me suele pasar que me imagino una situación cuando dibujo una escena y me gusta pensar que es como una foto, que justo atrapas a los personajes en ese momento, locuras que tenemos los artistas ya sabeis. Por eso me decidí a representar un espantapájaros roido, remendado, reposado en una madera algo rota; que por culpa de una ráfaga de viento ha quedado en esa posición dando asi un buen susto a los pajaros que en ese momento estaban a sus pies (FIG01).
PASO2
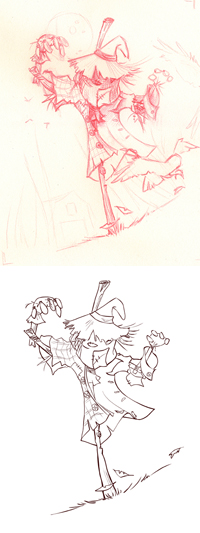
Una vez que tenia ya la idea me propuse pasarlo a lapiz, me gusta mucho la textura de lapiz sobre el papel; queria a provechar la linea de lapiz y después darle color en Photoshop (FIG02A). Más tarde me di cuenta que quedaba demasiado sucio y pasé a una linea en Flash (FIG02B) que queda más limpia, pero reservé el dibujo a lapiz porque lo usaria mas tarde para dar textura al dibujo.
PASO3
Para empezar me puse a pintar el fondo, en un inicio queria que fuera de noche y que la luz de la luna le diera un aspecto fiero por el contraluz; pero luego pensé que los cuervos no salen de noche, asi que decidí probar esa misma iluminación con una puesta de sol. Finalmente creo que fue una decisión mas buena porque contrasta más la luz del dia y la calma que trasmite frente a la oscuridad en la figura del espantapájaros.
Lo que mas ha impactado en esta ilustración es el fondo y sus colores, porque parecen como de acuarela. Para conseguirlo escojí un pincel granulado, al 30% de opacidad y con bordes humedos que me da diferentes texturas y luego con la herramienta dedo difumino las zonas que me interesan. Superponiendo varias capas consigo asi los diferentes colores y el fondo queda mucho mas suave. Siempre utilizo pinceles blandos para las superficies grandes y difuminadas, reservo los pinceles más duros para luego acabar de pulir detalles y zonas más definidas.
En las imágenes se puede ver que al principio el color era mas palido, lo que hice para dar mas fuerza al color es poner un degradado de un color mas anaranjado y con tonos de lila y darle una superposición de capa de luz focal (para los fondos este modo de capa saca colores muy bonitos)
PASO4
En la figura del espantapájaros aproveché la linea de flash para seleccionar los huecos y pintar por zonas, asi primero le di un color de base y fui añadiendo detalles para darle volumen (los cuadrados de la ropa, la iluminación, los diferentes planos en el personaje…). Me parecia mas complicado dar una buena iluminación, asi que una vez elegidos los colores me puse a delimitar las zonas de luz y de sombra.
PASO5
Ya acabados todos los detalles de la ilustración advertí que faltaba delimitar un poco los planos más cercanos y los más alejados. Quise aprovechar la iluminación del cielo, muy a ras de tierra, para crear un haz de luz que diera al brazo un tono diferente menos saturado y asi separarlo visualmente del cuerpo.
PASO6
Para finalizar la ilustración acabé de pulir los detalles de luz y brillos, definir más las zonas oscuras para darle mas contraste, añadir un poco de hierba al viento para darle mas dinamismo, algunos pequeños detalles de texturas y añadí elementos como el granero y la paja, que en primer plano acaba de darle la profundidad que queria conseguir.
Finalmente, dar las gracias a todos los que me votaron y espero poder seguir participando y aprendiendo de todos. Nos vemos.

MAKING OFF ScareCrow [ENGLISH]
Hi everybody!!
I’ve been following this monthly contest for a long time and I had never made up my mind to participate in one so far, although there have been interesting topics. Finally, the scarecrow topic has encourage me and here I am in my first making off. I hope it helps somebody somehow.
STEP1
When thinking about this topic, the first idea that I had was to provided it with dynamism, because  scarecrows themselves are very statics. I wanted to draw a very frightening scarecrow, but not due to its look but to the circumstances at that moment.
This is the reason why I used a low angle, that is point of view of the crows, this way the figure of scarecrow is more daunting.Afterwards, I made up a whole story. Is usually to happens to me that when drawing a scene I imagine a situation, and I like to think it is a photograph, which captures the characters at that precise moment; you know, crazy things of artists. I chose to draw a gnawed, worn out, remained scarecrow in a somewhat broken piece of wood, taken that position due to a gusty wind scaring the crows that in this moment were in its foots. (FIG01)
STEP2
Once I got the idea I proposed to draw it with a pencil, because I like its texture on the paper very much; I wanted to take advantage of the pencil line, and later, colouring it with Photoshop (FIG02A). Afterwards, I realized that it seemed dirty and  that is why I change to a line made with Flash (FIG02B), which is clearer, I kept the pencil drawing to use later to give texture.
STEP3
The next stage was to paint the background. My first intention was to show a nocturnal scene and the moonlight made a fierce aspect for against the light. But I thought the crows don’t go out at night, and I try the same lighting with a sunset. I think it was the better choice because this way the darkness of the scarecrow stands out in the calm and light of the sunset.
What has had the most profound impact on the people who have seen the drawing has been the background because it seems a watercolour. To achieve them, I choose a granulated brush with 30% opacity, an wet edges, which provides different textures, and then, with the smudge tool I blur the areas I like. Overlapping several layers I get the great variety of colours and gentle shift of shades from the sky to the clouds. I always use soft brushes for large, blurred surfaces, and keep the hard ones to polish up final details and more definite areas.
It can be notice in the picture that at the beginning the colour was paler, and to boost it I added a gradated from orangish to purple shade and applied focus light layer superposition (this layer mode gets very nice colours for the backgrounds).
STEP4
For the figure of the scarecrow I took advantage of the gaps created by the Flash line to paint by areas. I first applied a background colour and later added details to define volumes (the check shirt, lighting, the various planes of the character)
What seemed most important to me was to give the drawing good lighting, so once the colours had been selected I took up defining light and shadows areas.
STEP5
Once all the details of the drawing were finished, I realised that closest and farthest planes had to be marked out yet. I want to take advantage of the lighting of the sky, coming up from the horizon, to create a beam giving the arm a different shade, less saturated, and thus to detach it from the body.
STEP6
To finish the drawing I polished some light and shining details, defined dark areas better to give it more contrast, added some blades of grass to obtain more dynamism, some textures and added some parts as the barn and the straw, wich in the first plane gives the depht I wanted to reach.
Finally, I would like to thank everyone who voted for me in this contest and I hope to be able to go on taking part and learning from each other. See you!!